Create a relative date slicer and filter in Power BI
With the relative date slicer, relative date filter, or date picker slicer setting, you can apply time-based selections using a date column. For example, you can show only sales data from within the last 30 days or last calendar month. When you view the report, the relative date period is applied, and the specified range filters the other visuals on the page. The Date picker slicer setting (preview) extends this capability by adding a calendar and slider for manual date selection and offering anchor options based on today, the first date, or the last date in your data.
Use the Date picker slicer setting (preview)
The Date picker slicer setting provides
relative date selections similar to the Relative date setting,
plus a calendar and slider for selecting specific dates or date ranges.
Use Date picker when you want both relative options and the
ability for report viewers to pick a manual date or date range.
Date picker offers three anchor options for the relative
selection:
- Today:
The relative range is calculated from the current date when the report is
viewed. This anchor uses the same behavior as the Relative date setting.
- Last
date: The relative range is calculated from the most recent date in
the date column. Useful when your data isn't current or you want the
slicer to follow the latest data.
- First
date: The relative range is calculated from the earliest date in the
date column.
When you set a relative selection like "last full
month," the slicer keeps the date range up to date as the anchor date
changes. Report viewers can change the relative options when interacting with
the report, or select any manual date range or single date using the calendar
or slider.

To change the slicer setting to Date picker, select the slicer, then in the Format pane, expand Visual > Slicer settings > Options and select Date picker from the Style dropdown.
During preview, you can only create date picker slicers in
Power BI Desktop. After you publish a report with a date picker slicer, you can
use and edit it in the Power BI service.
Create the relative date range slicer
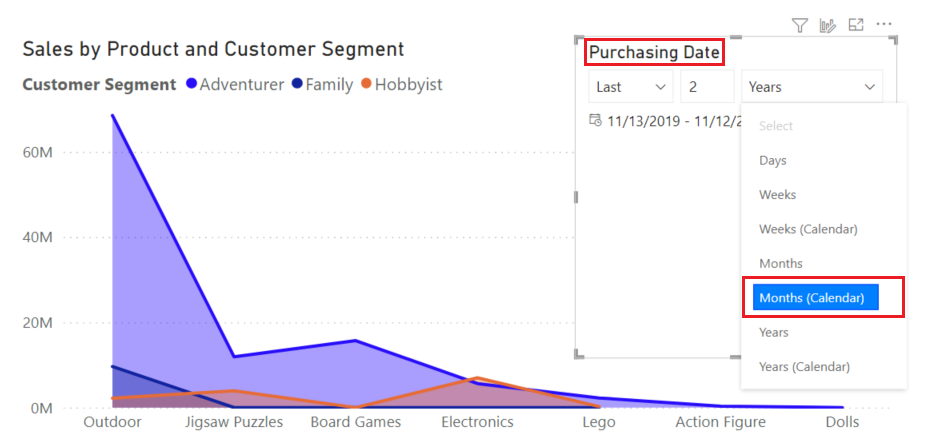
You can use the relative date slicer just like any other slicer or visual when editing a report in Power BI. Select a Slicer visual to add it to your report page and then select a date column for the Field value. In the following image, we selected the Date column.

Select the slicer visual, and in the Format pane,
under Visualizations > Slicer settings > Options,
change the Style to Relative Date.

You can then select the settings in the date slicers. These
settings are relative to the day the report is viewed, not the data range in
the date column.
For the first setting, you have the following choices:
- Last
- Next
- This
In the screenshot, Last is selected.

In the second (middle) setting in the relative date slicer,
you enter a number to define the relative date range. This option is only
available for Last or Next, and disabled for This from
the first setting.
In the screenshot, 2 is selected.

In the third setting, you pick the date part. You have the
following choices:
- Days
- Weeks
- Weeks
(Calendar)
- Months
- Months
(Calendar)
- Years
- Years
(Calendar)
In the screenshot, Years is selected. The
settings are read as in the last 2 years and the date column
is filtered to only dates in the last 2 years for the other visuals on the
report page.

If you select Months instead, to make it
the last 2 months, here's what happens:
- If
today is July 20:
- The
data included in visuals constrained by the slicer shows data for the
previous two months,
- Starting
on May 21 and going through July 20 (today's date).
In comparison, if you selected Months (Calendar), the visuals constrained would show data from May 1 through June 30. The setting corresponds to the last two complete calendar months.
Create the relative date range filter
You can also create a relative date range filter for your
report page or your entire report. To do so, drag a date column from the Data pane
into the Filters on this page section or the Filters
on all pages section in the Filters pane:

Once there, you can change the relative date range. It's
similar to how you can customize the relative date slicer.
Select Relative date from the Filter type drop-down.

After you select Relative date, you see three
sections to change under Show items when the value, including a
middle numeric box, just like the slicer.

Use DAX measures to surface the latest value and its date
If you want to display the most recent value in your data
along with the date it corresponds to, you can use DAX measures instead of or
alongside a slicer. This approach is useful for card visuals or summary tiles
that always show the latest data point.
Use the LASTNONBLANKVALUE function
to return the value for the last date that has data, and the LASTNONBLANK function
to return that date.
Create two measures:
- Latest
value returns the value for the most recent date that isn't
blank:
DAX
Latest Value = LASTNONBLANKVALUE('Sales'[Date],
SUM('Sales'[Amount]))
- Latest
date returns the date that corresponds to that value:
DAX
Latest Date = LASTNONBLANK('Sales'[Date],
SUM('Sales'[Amount]))
Replace 'Sales', [Date], and [Amount] with the table and column names from your model. To give report viewers immediate context about the most recent data point, add the measures to a card visual or display them next to a slicer.
Considerations and limitations
The following considerations and limitations apply before
showing the relative options in the slicer or filter pane.
- The
data type for the column used in the slicer must be a date.
- The
date hierarchy for auto date/time in Power BI can't be used. Use the date
column directly.
- Date
columns in Power BI don't include time zone info.
- When
the report is published, slicer and filter relative options are always
based on the time in UTC. If you set up a filter in a report and send it
to a colleague in a different time zone, you both see the same data.
- The relative week options assume weeks start on Sunday. There's no option to change the start to a different day.
Comments
Post a Comment
Hi User,
Thanks for visiting My Blog and please provide your valuable feedback and subscribe for more updates. Please don't post any spam content or comments.
Thank You